How to install Ruby on Rails on a Mac. With Ruby 3.0 and Rails 6.1 on macOS Big Sur or Catalina. Up-to-date and kitchen-tested instructions, with troubleshooting tips, from the author of the book, Learn Ruby on Rails.
This article will help you set up a development environment for Ruby on Rails. This guide is for beginners as well as experienced developers setting up a new computer. If you need Ruby but not Rails, follow the guide to Install Ruby on macOS.
This guide provides full details, how to:
- update to macOS
- install Xcode Command Line Tools
- install Homebrew
- configure Git
- install a software version manager
- install Node and Yarn
- install Ruby 3.0
- update gems
- install Rails 6.1
- create a new Rails application
- tips and troubleshooting
Installation steps
Here are steps to install Ruby on Rails (details in this complete guide).
- prepare your Mac
- install Homebrew or a software version manager
- install Ruby
- install Node and Yarn
- update
$PATHsettings in the.zshrcfile if necessary
Setting up your development environment includes checking that macOS is up to date, installing the Xcode Command Line Tools (to add needed Unix utilities), configuring Git (an important tool for save-as-you-go file storage), installing the Homebrew package manager (to add more software packages), and choosing a software version manager for Ruby.
After you've prepared your computer and installed Ruby, it's easy to install Rails. But you'll also have to set up a JavaScript environment with Node and Yarn, which is required for creating a new Rails application.
Installation choices
Before you install Ruby, you should choose Homebrew or a software version manager. You have several choices for version managers. Plus Homebrew and Docker. Here's what I recommend:
First, understand the difference between Homebrew and software version managers. Homebrew is a package manager that adds Ruby, other languages, and software packages to the Mac. It can install one (and only one!) version of Ruby (the latest version). You can also install software version managers that install and switch between multiple versions of a language such as Ruby. Finally, some developers use Docker, which is a container system that sets up multiple development environments (like having multiple computers with different configurations). Here's how to choose.
Install with Homebrew if you’re building only one project with Ruby (for example, if you are a student learning Ruby). If you’re a solo developer and you need to juggle multiple projects that can't be updated all at once, use asdf or chruby or rbenv. Choose asdf if you're using multiple languages such as Ruby, Node, and Python; this makes it a good choice for Rails developers. Otherwise chruby or rbenv are fine for just managing Ruby versions. Finally, use Docker (or Nix) if you’re on a team with a complex project environment (for example, Ruby, Node, Redis, and PostgreSQL all in one project). Here are details.
Asdf and chruby are software version managers. If you need to switch between versions of Ruby, use asdf or chruby. Asdf is your best choice because it is a universal version manager that installs and manages Ruby, JavaScript, Python, Elixir, and several other languages. Chruby is efficient and simple but it works only with Ruby.
Rbenv and rvm are also popular as Ruby version managers. Sam Stephenson's rbenv has a more complex implementation than chruby (it installs extra “shim” files). RVM was once the most popular of Ruby version managers but its additional features (gemsets) are no longer needed and add unnecessary complexity.
Docker is a containerization tool that some developers use for version management. The primary use case for Docker is to create a reproducible virtual server that contains a configured version of any software dependency needed to run an application (language, databases, message queues). As such, it is ideal for creating a "frozen" version of a development environment for deployment to a server. You can also develop locally within a container but it will run slower, require more memory, and adds configuration complexity compared to a simple version manager. To keep things simple, don't use Docker for local development unless your application is disturbingly complex.
If you don't need a version manager, install Ruby using the Homebrew package manager. Use this approach if you are only building a casual project that you will not maintain, or if you are just trying out Ruby to learn the language. You can easily remove Ruby after installing with Homebrew (and re-install a newer version when you need it). Don't install Ruby with Homebrew if you need to switch among Ruby versions (use asdf or chruby in this case).
Finally, you should know that macOS comes with a system Ruby pre-installed. MacOS Big Sur or Catalina includes Ruby 2.6.3 which is not the newest version. If you use the system Ruby you'll need root access (sudo) to install gems (introducing a security risk). And you'll end up with a cluster of (sometimes incompatible) gems that can't be easily removed to restore your system to a clean state. Please use either asdf, chruby, or Homebrew.
You'll find instructions here for installing Ruby using asdf, chruby, or Homebrew.
Have you decided whether you'll install Ruby with asdf, chruby, or Homebrew? In the next sections, you'll
- check your macOS version
- install Xcode Command Line Tools
- install Homebrew
- either directly install Ruby with Homebrew or install a software version manager
- and finally install Ruby with asdf or chruby.
Continue to the next section to check your computer before installing Ruby.
A newer version of this article is available as the Install Rails Mac guide on the Learn Rails website.
Update macOS
It's best to use the newest macOS version. The latest release is macOS Big Sur 11.0 (Big Sur was released on November 12, 2020). If you have an older Mac, Big Sur will run slowly, so you might want to use macOS Catalina.
Upgrade macOS
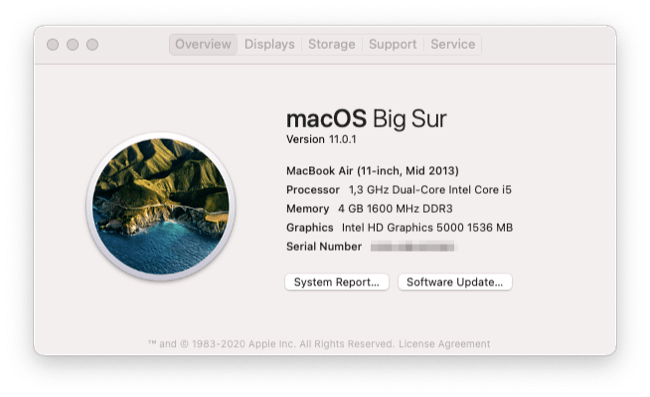
Check your macOS version. Under the Apple menu, check "About This Mac." It should show "Version 10.15.7” (for Catalina) or "Version 11.0.1” (for Big Sur) or newer.
If you need to upgrade, see Apple's instructions Upgrade to macOS Big Sur. From macOS Catalina 10.15 or Mojave 10.14, you can upgrade using Software Update in System Preferences. For earlier versions, you can upgrade to macOS Big Sur from the App Store. Allow plenty of time for the download and installation (it may take several hours, especially if you've owned your Mac for several years and haven't updated macOS).
After you’ve upgraded, you’ll use the macOS Terminal application to continue with this guide. See the section, Finding and Using the Mac Terminal, if you need help finding the Terminal.
Next, let's check if your Terminal application is set up properly.
Z shell
By default, Zsh (the Z shell) is the program that runs in the Terminal that interprets Unix commands. Before macOS 10.15 Catalina, the Terminal used the Bash shell as its default. Open the Terminal application and check which shell program is running in your terminal:
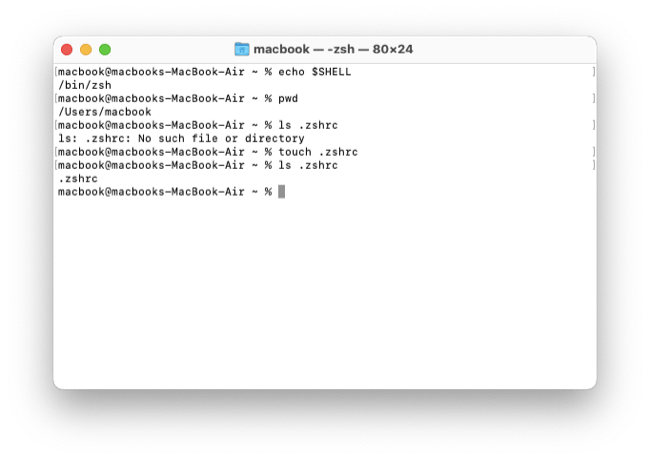
$ echo $SHELL
/bin/zsh
Don't type the $ (that's just a prompt to let you know you are in the console).
If you see /bin/bash you can update the default to Zsh by running chsh -s /bin/zsh.
Configuring the shell
You can configure the Zsh system environment by creating a file in your user home folder that the Z shell will read when the Terminal application is launched. The configuration file is named .zshrc. By the way, if you’re curious, the rc in the file name stands for “run commands.”
The .zshrc file doesn't exist by default in macOS so you need to create it. First, in the Terminal, make sure you are in your home folder:
$ pwd
/Users/daniel
Check if the file exists already:
$ ls .zshrc
ls: .zshrc: No such file or directory
If the file already exists, you can edit it. Otherwise, create an empty .zshrc file and check that it exists:
$ touch .zshrc
$ ls .zshrc
.zshrc
Now, when needed, you can edit the file. You'll need to edit the .zshrc file when you set up the software version manager, so it's good to have it ready.
Setting the $PATH in the .zshrc file lets you specify the folder that contains the latest Ruby version.
Here's what your $PATH looks like when macOS is fresh, before adding Homebrew.
$ echo $PATH
/usr/bin:/bin:/usr/sbin:/sbin
This $PATH will give you the default system Ruby if you enter ruby -v in the terminal application.
Tip: macOS hidden files
The .zshrc file is hidden so you won’t see it in the macOS file browser when you want to edit it.
Configuration files are often hidden in macOS. It’s easy to hide a file; just use a dot as the first character in the file name.
You can list all files, including hidden files, with the ls -lag command in the Terminal.
In the macOS Finder (the file browser), you can enter Command + Shift + . to show hidden files. If you want to hide those files again, you can enter the same keystrokes.
You can force the Mac to always display hidden files by entering the following command in the Terminal application:
$ defaults write com.apple.finder AppleShowAllFiles TRUE; killall FinderHidden files will appear in gray in the Finder window.
Your macOS and Terminal application are set up. Next we'll check if Apple's Xcode Command Line Tools are installed.
A newer version of this article is available as the Install Rails Mac guide on the Learn Rails website.
Xcode Command Line Tools
You need to install Apple's Xcode Command Line Tools to get the Unix tools needed to install Ruby and develop applications. Apple’s Xcode Command Line Tools provide a C language compiler. You'll need it to install Ruby. Also, for many Ruby projects, you will need the C language compiler to automatically install gems that use native extensions (some gems speed up Ruby by using code written in C).
Xcode is Apple's software library for macOS developers. Xcode is over 40GB. You don't need all of it!. You just need the Xcode Command Line Tools. Only install the full 40GB Xcode package if you plan on doing development of applications for the Apple operating systems (macOS or iOS apps). Here you’ll learn how to just install the Command Line Tools that give you common Unix utilities.
It's easiest to install Command Line Tools as a part of installing Homebrew, the Unix utilities package manager. If you have a fresh install of macOS, skip ahead to the next section, Install Homebrew.
If you updated your macOS from an earlier version, you may have an outdated version of Xcode. Read on to check if you have a troublesome out-of-date Command Line Tools.
Is Xcode already installed?
If you updated your macOS from an earlier version (sometimes called an "over the top" installation), and you previously installed a Ruby development environment, your earlier installation remains intact. You will need to install the new version of Xcode Command Line Tools to avoid headaches. First, check what you have.
Check if you previously installed the full Xcode package:
$ xcode-select -pScenario 1
If you see, xcode-select: error: unable to get active developer directory..., the Xcode package is not installed.
Good! Jump to the section, Install Homebrew.
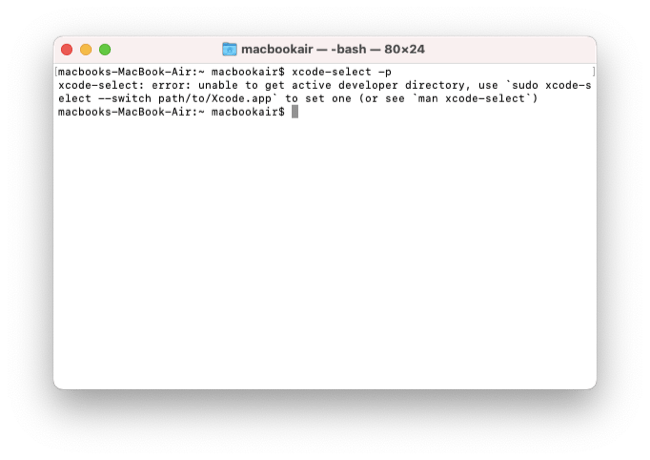
The Xcode package is not installed
Scenario 2
If you see a file location that contains spaces in the path:
/Applications/Apple Dev Tools/Xcode.app/Contents/Developeryou will have problems installing Ruby. You should delete Xcode before continuing.
Scenario 3
If you see:
/Applications/Xcode.app/Contents/DeveloperThe full Xcode package is already installed. Perhaps you installed it previously. If Xcode is installed, you will need to update Xcode to the newest version (Xcode 12.2 or newer). Go to the App Store application and check "Updates." After updating Xcode, be sure to launch the Xcode application and accept the Apple license terms.
Scenario 4
If you see:
/Library/Developer/CommandLineToolsThe Xcode Command Line Tools may be installed or an empty directory may be present.
Here's how to test:
$ ls /Library/Developer/CommandLineTools/usr/bin/gitYou should see:
/Library/Developer/CommandLineTools/usr/bin/gitCheck that you can run git:
$ git --version
git version 2.30.1 (Apple Git-130)
If Xcode Command Line Tools are installed, you can skip ahead to install Homebrew.
If the Xcode Command Line Tools folder is empty, you should remove it.
Remove the empty folder:
$ sudo rm -rf /Library/Developer/CommandLineToolsYou are using sudo for admin access so you must enter the password you use to log in to your computer (you will not see the password after entering it). After removing the folder, continue to the section, "Install Homebrew."
A newer version of this article is available as the Install Rails Mac guide on the Learn Rails website.
Install Homebrew
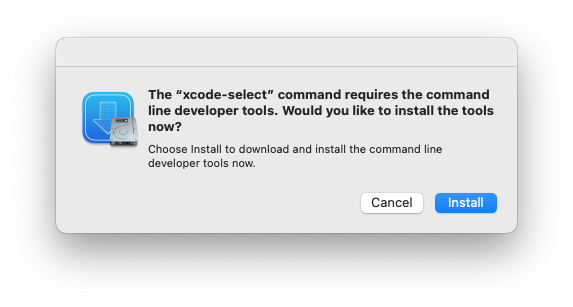
Developers use the Homebrew utility to install various Unix software packages. If you haven't already installed Xcode Command Line Tools, Homebrew will install it.
Tip: If you did not use a password to log in to your Mac (that is, if your password is blank), you cannot install Homebrew.
Check if Homebrew is installed:
$ brewHomebrew is not installed if you see:
zsh: command not found: brewIf Homebrew is not installed, there should be no Homebrew files in /usr/local (for macOS Intel) or /opt/homebrew (for Apple Silicon).
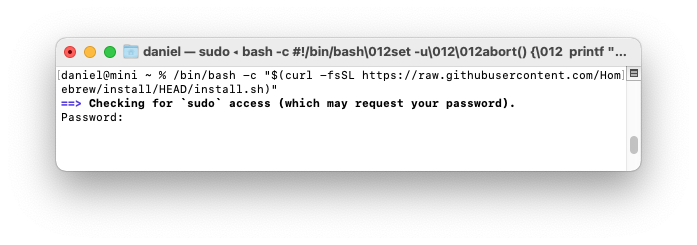
Homebrew provides an installation script (check that it hasn't changed at the Homebrew site).
$ /bin/bash -c "$(curl -fsSL https://raw.githubusercontent.com/Homebrew/install/HEAD/install.sh)"The Homebrew installation script will ask you to enter your Mac user password.
Password:You won't see the characters as you type. Press enter when you are done.
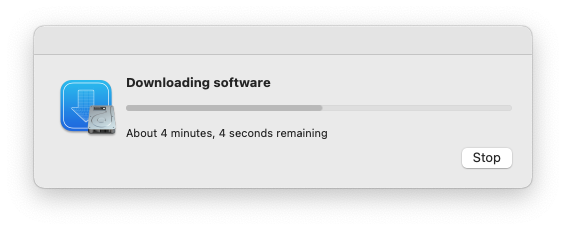
You'll see a list of files and folders that Homebrew will install. If you haven't already installed XCode CommandLine Tools, you'll see a message that "The XCode Command Line Tools will be installed." Press return to continue when prompted by the Homebrew installation script. It takes five to ten minutes to download and install the Command Line Tools.

Homebrew installation takes many minutes (you’ll see diagnostic and progress messages).
On Mac Intel machines, that's all you need to do; Homebrew is ready to use. On Mac Intel, Homebrew installs itself into the /usr/local/bin directory, which is already configured for access by the shell with the macOS default $PATH environment variable (the default is set by the /usr/libexec/path_helper command).
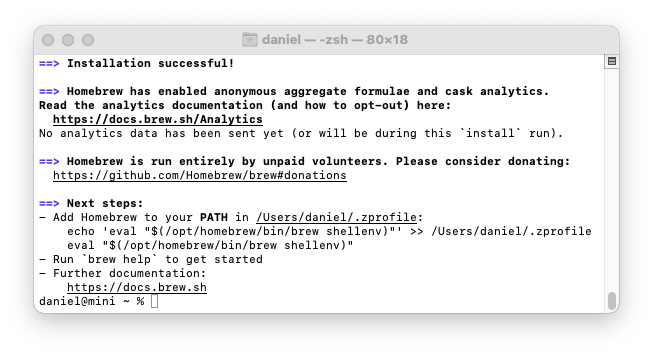
On Apple Silicon machines, there's one more step. Homebrew files are installed into the /opt/homebrew folder. But the folder is not part of the default $PATH. Follow Homebrew's advice and create a ~/.zprofile file which contains a command which sets up Homebrew. Homebrew shows instructions at the end of the installation process:
- Add Homebrew to your PATH in /Users/daniel/.zprofile:
echo 'eval "$(/opt/homebrew/bin/brew shellenv)"' >> /Users/daniel/.zprofile
eval "$(/opt/homebrew/bin/brew shellenv)"
Copy and paste from the Homebrew instructions because they include your own user directory name (the example above contains my user directory name).
After you've installed Homebrew, check that Homebrew is installed properly.
$ brew doctorYou should see:
Your system is ready to brew.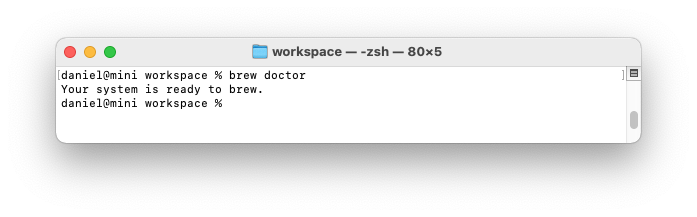
On Apple Silicon, if you see zsh: command not found: brew, check that you've created a ~/.zprofile file as described above and restarted your terminal application.
If Homebrew is successfully installed, there will be Homebrew files in /usr/local (for macOS Intel) or /opt/homebrew (for Apple Silicon).
As you use Homebrew, it is helpful to see a list of all the packages you've installed, or packages and dependencies.
$ brew list
$ brew deps --tree --installed
Right now, immediately after installation, these commands show nothing is installed.
Next we'll configure Git, an essential tool for any developer. But first, be aware that you may have to reinstall Command Line Tools after a macOS upgrade.
After a macOS Upgrade
After a macOS upgrade (for example, from macOS 11.2.2 to 11.2.3), the upgrade process may remove the Command Line Tools. This can be annoying if you install an upgrade and then find you can't use commands such as git. You may encounter an error like:
xcrun: error: invalid active developer path (/Library/Developer/CommandLineTools),
missing xcrun at: /Library/Developer/CommandLineTools/usr/bin/xcrun
Checking for the Command Line Tools folder may show that the folder is there:
$ xcode-select -p
/Library/Developer/CommandLineTools
But look closely and the Command Line Tools folder may be missing essential folders and files after a macOS upgrade. It should look like this:
$ ls -l /Library/Developer/CommandLineTools
total 0
drwxr-xr-x  5 root  wheel  160 Jan  9 07:43 Library
drwxr-xr-x  5 root  wheel  160 Apr 24 16:19 SDKs
drwxr-xr-x  7 root  wheel  224 Apr 24 16:19 usr
It may look like this after an upgrade:
$ ls -l /Library/Developer/CommandLineTools
total 0
drwxr-xr-x  7 root  wheel  224 Apr 24 16:19 usr
Homebrew is installed but brew doctor will show problems:
% brew doctor

Warning: Git could not be found in your PATH.
Homebrew uses Git for several internal functions, and some formulae use Git
checkouts instead of stable tarballs. You may want to install Git:
  brew install git

Warning: No developer tools installed.
Install the Command Line Tools:
  xcode-select --install
You've already installed Homebrew and allowed Homebrew to install Xcode Command Line Tools. Now you must re-install Xcode Command Line Tools from the command line:
$ xcode-select --installA message will pop up on the screen. Confirm that you want to install the tools.
You'll see a progress indicator as the software downloads.
Finally you'll see a confirmation that the software was installed.
Verify that you've successfully installed Xcode Command Line Tools.
$ xcode-select -p
/Library/Developer/CommandLineTools
Check that you can run git:
git --version
git version 2.30.1 (Apple Git-130)
You've seen how to reinstall Command Line Tools after a macOS upgrade.
Next, if you haven't already done so, we'll configure Git, an essential tool for any developer.
A newer version of this article is available as the Install Rails Mac guide on the Learn Rails website.
Configure Git
Git is automatically installed as part of the Xcode Command Line Tools. It is essential software for save-as-you-go control of the code you write.
Before installing Ruby, you should configure Git. Using GitHub or a similar service, developers collaborate with others and deploy applications for hosting. As a Ruby developer, you'll use Git with a GitHub account for remote backup and collaboration.
Before you configure Git, you should create an account on GitHub (it's free). It is important to use the same email address for GitHub and your Git configuration.
Check that Git is installed:
$ git versionYou should see git version 2.24.3 (or newer).
Configure Git if you haven't used it before. First, list the current settings with the git config -l --global command.
$ git config -l --global
fatal: unable to read config file '/Users/.../.gitconfig': No such file or directory
Then set your name and email address (use your real name and the same email address as your GitHub account). Don't just copy and paste the code you see here, use your own name and email.
$ git config --global user.name "Your Real Name"
$ git config --global user.email me@example.com
Check your Git configuration:
$ git config -l --global
user.name=Your Real Name
user.email=me@example.com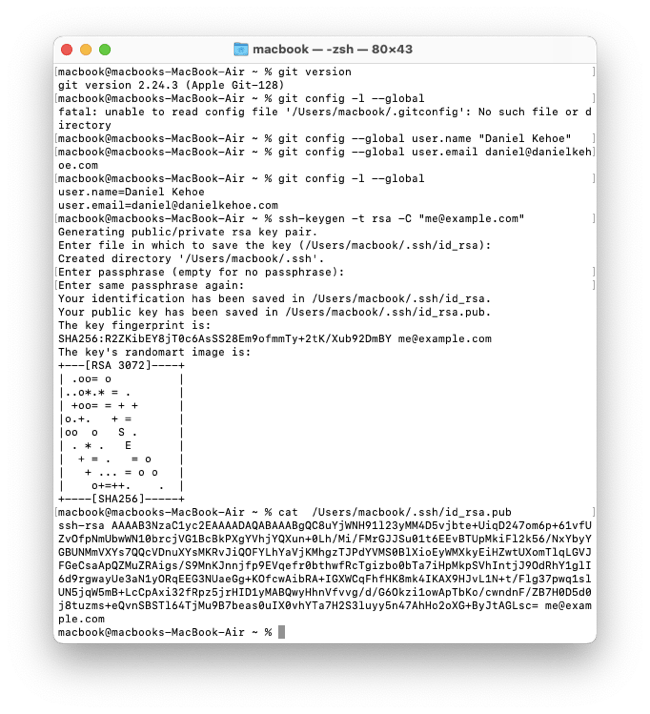
Set up password-less login
After you create an account on GitHub, set up an SSH key so you don't have to enter a username and password every time you connect to GitHub from the Terminal.
$ ssh-keygen -t ed25519 -C "me@example.com"
Generating public/private ed25519 key pair.
Enter file in which to save the key (/Users/me/.ssh/id_ed25519):
Created directory '/Users/me/.ssh'.
Enter passphrase (empty for no passphrase):
Enter same passphrase again:
Your identification has been saved in /Users/me/.ssh/id_ed25519.
Your public key has been saved in /Users/me/.ssh/id_ed25519.pub.
The key fingerprint is:
SHA256:R+t5PZM+g/3f7t/u3ZtGxpcbj1Mmmpcv1mK5Sa5OC8A me@example.com
The key's randomart image is:
+--[ED25519 256]--+
|                 |
|                 |
|          .      |
|       . . .     |
|        E o   . .|
|         + . ..B+|
|          + o=OO=|
|           ++=#*O|
|           .+=*^^|
+----[SHA256]-----+
The ssh-keygen command creates an encrypted key. You'll be prompted for a file in which to save the key. Press enter for the default.
You'll be prompted for a passphrase to enter whenever you use the encrypted key. You can enter RETURN for no passphrase. This is safe if you are sure only you can log into your Mac user account and access the terminal. If someone else can use your terminal, they can push code to GitHub projects that require your credentials. My advice: Enter a passphrase if you are likely to leave your computer unattended and your account logged in. Otherwise, save yourself extra effort and leave the passphrase empty if you're the only one who can use your account to push code to GitHub.
You'll need to enter the public key (NOT the private key) to set up password-less login on your GitHub account.
Use a shortcut to copy the public key to your macOS clipboard:
$ pbcopy < ~/.ssh/id_ed25519.pubOr you can display the public key with the cat ~/.ssh/id_ed25519.pub command and copy and paste it.
Copy the public key from the Terminal and paste it here in your GitHub settings.
Verify the SSH key is configured correctly:
$ ssh -T git@github.com
The authenticity of host 'github.com (52.74.223.119)' can't be established.
RSA key fingerprint is SHA256:nThbg6kXUpJWGl7E1IGOCspRomTxdCARLviKw6E5SY8.
Are you sure you want to continue connecting (yes/no/[fingerprint])? yes
After answering "yes" to continue, you should see:
Warning: Permanently added 'github.com,52.74.223.119' (RSA) to the list of known hosts.
Hi (name)! You've successfully authenticated, but GitHub does not provide shell access.
Now you'll be ready to use GitHub when you need it. Unless you've encountered a connection problem.
Troubleshooting connection problems
Some Internet service providers (ISPs) block connections on port 22. Your ISP may be blocking port 22 if you get error messages like this:
$ ssh -T git@github.com
ssh: connect to host github.com port 22: Connection refused
$ ssh -T git@github.com
ssh: connect to host github.com port 22: Network is unreachable
It's difficult to see that the problem lies with your ISP and not your computer or GitHub. You can connect on port 443 instead. Try the workaround.
Create a file ~/.ssh/config and add a setting so connections to GitHub will use port 443.
$ touch ~/.ssh/configEdit the file to add:
Host github.com
  Hostname ssh.github.com
  Port 443
After saving the ssh configuration file, try connecting to GitHub with ssh:
$ ssh -T git@github.com
The authenticity of host '[ssh.github.com]:443 ([192.30.255.122]:443)' can't be established.
RSA key fingerprint is SHA256:nThbg6kXUpJWGl7E1IGOCspRomTxdCARLviKw6E5SY8.
Are you sure you want to continue connecting (yes/no/[fingerprint])? yes
Warning: Permanently added '[ssh.github.com]:443,[192.30.255.122]:443' (RSA) to the list of known hosts.
Hi DanielKehoe! You've successfully authenticated, but GitHub does not provide shell access.
Now you'll be ready to use GitHub when you need it.
A newer version of this article is available as the Install Rails Mac guide on the Learn Rails website.
Install Asdf Version Manager
Most developers will need to install newer Ruby versions as they are released. And they will maintain applications that use older Ruby versions. A version manager makes it easy to switch between Ruby versions.
For a version manager, I recommend asdf. Asdf can manage versions of many languages, including Ruby and Node (especially helpful to Ruby on Rails developers).
The asdf website provides asdf installation instructions. Older versions of the instructions say you should manually install dependencies (including coreutils) with Homebrew but I've found that dependencies are automatically installed by the Homebrew asdf script (the Homebrew "formula").
Install asdf
You can install asdf using Homebrew.
$ brew install asdfAfter installing asdf with Homebrew, you can view the installed dependencies with brew deps --tree --installed.
We must add asdf to the shell environment before we can use it to manage Ruby versions. The Homebrew post-installation message for asdf doesn't mention this, but the asdf website explains it is needed. The post-installation message for asdf from Homebrew just says, "zsh completions have been installed to: /opt/homebrew/share/zsh/site-functions" (on Apple Silicon), meaning that asdf commands can be auto-completed by pressing the tab key when you are using the terminal application.
Add asdf to the .zshrc file
Use a shortcut to configure your shell to use asdf:
$ echo -e "\n. $(brew --prefix asdf)/asdf.sh" >> ~/.zshrcThis will add asdf to your $PATH configuration.
Check the .zshrc file.
$ cat ~/.zshrcYou should see configuration commands for asdf on the last line. For Mac Intel:
. /usr/local/opt/asdf/asdf.shOn Apple Silicon:
. /opt/homebrew/opt/asdf/asdf.shConfiguration for asdf should always be the last line in the .zshrc file, after setting any $PATH configuration.
🚩 Close and reopen the Terminal window for the changes to the .zshrc file to be recognized.
After closing and reopening the Terminal window, use asdf --version to check that asdf was installed successfully.
$ asdf --version
v0.8.0
If the asdf command doesn't work, make sure you've added the asdf configuration to your .zshrcfile and restarted the terminal application.
You can also check that asdf appears in your $PATH configuration (this is the Apple Silicon version where Homebrew installs packages in /opt/homebrew/):
$ echo $PATH
/Users/daniel/.asdf/shims:/opt/homebrew/opt/asdf/bin:/opt/homebrew/bin:/opt/homebrew/sbin:/usr/local/bin:/usr/bin:/bin:/usr/sbin:/sbin
Add the .asdfrc configuration file
If you are working on any older projects that use a .ruby-version file to specify a Ruby version, add a .asdfrc configuration file to your user home directory to enable asdf to read .ruby-version files.
$ echo "legacy_version_file = yes" >> ~/.asdfrcConfirm the creation of the configuration file.
$ cat ~/.asdfrc
legacy_version_file = yes
Asdf .tool-versions file
When you work on a project, you can tell asdf which language versions you need by adding a .tool-versions file to your project folder. This is a multi-language alternative to configuration with the .ruby-version file.
ruby 3.0.0
nodejs 10.16.0
More
The Uninstall Ruby page explains how to remove asdf, if you decide not to use it.
Now you can install the newest Ruby version.
A newer version of this article is available as the Install Rails Mac guide on the Learn Rails website.
Install Node and Yarn
Node and Yarn manage the JavaScript used by a Rails application. Unless you create backend-only (API) Rails applications, there will always be a little (and sometimes too much) JavaScript in your Rails application.
Install Node
You’ll need to install Node, the server version of JavaScript, before you develop any Rails applications. Node must be installed on your computer to run JavaScript in the local development environment.
Early versions of Rails only required the Ruby language for development. More recently (after Rails 5.1), Rails uses Node to run the JavaScript build tool, Webpack, to bundle together any JavaScript files used in an application. It’s difficult to develop fullstack Rails applications without installing Node.
It’s easy to install Node with asdf. Alternatively, you can download and install Node with Homebrew with brew install node, or directly from the nodejs.org website. Or you can install NVM, the Node version manager, and use NVM to install Node. I recommend keeping it simple and just installing Node with asdf.
First, be sure you've completed the section, Asdf Version Manager.
Install the asdf plugin for Node (it tells asdf how to install Node):
$ asdf plugin add nodejs
initializing plugin repository...
Cloning into '/Users/macbook/.asdf/repository'...
remote: Enumerating objects: 33, done.
remote: Counting objects: 100% (33/33), done.
remote: Compressing objects: 100% (30/30), done.
remote: Total 2633 (delta 18), reused 10 (delta 3), pack-reused 2600
Receiving objects: 100% (2633/2633), 611.28 KiB | 619.00 KiB/s, done.
Resolving deltas: 100% (1253/1253), done.
See all the versions of Node that are available:
$ asdf list all nodejsDownload authentication keys (required for security):
$ bash -c '${ASDF_DATA_DIR:=$HOME/.asdf}/plugins/nodejs/bin/import-release-team-keyring'Install the latest version of Node:
$ asdf install nodejs latestYou need to specify a default version of Node in your home ~/.tool-versions file. You can set the ~/.tool-versions file with a command:
$ asdf global nodejs 15.4.0To verify that Node is installed:
$ node --version
v15.4.0
You should see v15.4.0 or newer.
Install Yarn
Yarn is a package manager for JavaScript. It’s similar to the better-known NPM (Node Package Manager). It’s used by Rails to manage JavaScript dependencies.
Install the asdf plugin for Yarn:
$ asdf plugin add yarnSee all the versions of Yarn that are available:
$ asdf list all yarnInstall the latest version of Yarn:
$ asdf install yarn latestYou need to specify a default version of Yarn in your home ~/.tool-versions file. You can set the ~/.tool-versions file with a command:
$ asdf global yarn 1.22.10To verify that Yarn is installed:
$ yarn --version
v1.22.10
You should see v1.22.10 or newer.
The JavaScript build tools are now installed and ready. Next we'll install Ruby.
A newer version of this article is available as the Install Rails Mac guide on the Learn Rails website.
Install Ruby with Asdf
Here are instructions for installing Ruby using asdf, the software version manager. If you are not using asdf, you can see instructions for Installing Ruby with chruby or Homebrew.
If you plan to use asdf, be sure you've completed the section, Install Asdf Version Manager.
Mac system Ruby
MacOS comes with a "system Ruby" pre-installed. MacOS Big Sur and Catalina include Ruby 2.6.3 which is not the newest version. It's a bad idea to use the Mac system Ruby. See the article Do not use the MacOS system Ruby. You can see the system Ruby with which ruby and ruby -v.
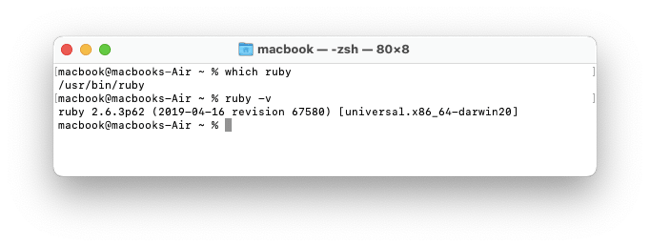
Leave the system Ruby in place and use the software version manager to install the newest Ruby version.
Install Ruby with Asdf
Check online for the current recommended version of Ruby.
When this was written, Ruby 3.0.1 was the newest version (3.0.0 was released on Dec 25, 2020).
First, install the asdf plugin for Ruby:
$ asdf plugin add rubySee all the versions of Ruby that are available:
$ asdf list all rubyIf you don't see the newest version of Ruby, update the asdf plugin for Ruby and try again:
$ asdf plugin-update ruby
$ asdf list all ruby
Install the latest version of Ruby:
$ asdf install ruby latestYou’ll see diagnostic messages and progress updates. Installation may take thirty minutes or more.
You need to specify a default version of Ruby in your home ~/.tool-versions file. You can set the ~/.tool-versions file with a command:
$ asdf global ruby 3.0.1🚩 After installation, close and re-open the terminal window.
Verify installation of Ruby
Verify that the newest version of Ruby is installed with ruby -v.
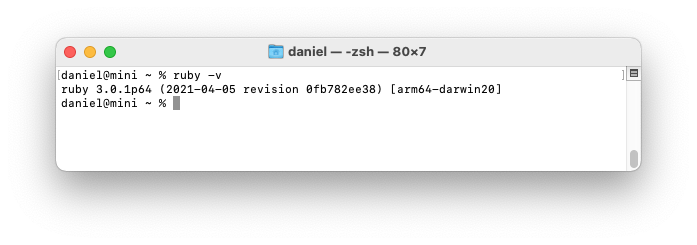
When this was written, Ruby 3.0.1 was the newest version (3.0.0 was released on Dec 25, 2020).
If you see Ruby version 2.6.3, it is the system Ruby and you likely forgot to close and re-open the terminal window.
If you see No version set for command ruby, you need to specify a default version of Ruby in your asdf ~/.tool-versions file.
For example, create a ~/.tool-versions file like this:
ruby 3.0.1The Uninstall Ruby section explains where Ruby versions are installed and how to remove them.
Next, you can optimize the Ruby development environment by updating gems.
A newer version of this article is available as the Install Rails Mac guide on the Learn Rails website.
Update gems
Experienced developers use a few tricks to optimize the Ruby development environment and keep it up to date. It's best if everything is up to date before you start a new project.
Faster Gem Installation
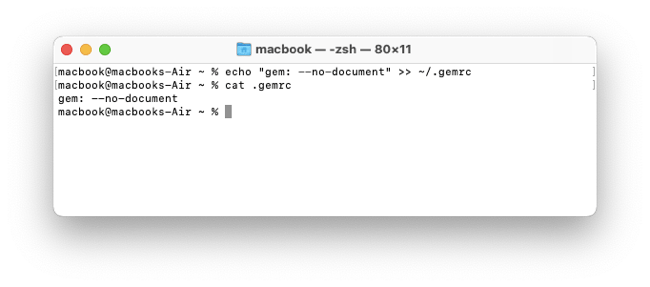
By default, when you install gems, documentation files will be installed. Developers seldom use gem documentation files (they browse the web instead). Installing gem documentation files takes time, so many developers like to toggle the default so no documentation is installed.
Here's how to speed up gem installation by disabling the documentation step:
$ echo "gem: --no-document" >> ~/.gemrcThis adds the line gem: --no-document to a hidden .gemrc file in your home directory.
Check the gem manager
RubyGems is the package manager in Ruby. We use it to install software packages that add functionality to Ruby.
Check the installed gem manager version.
$ gem -v
3.1.4
You can check if a newer RubyGems version is available. Use gem update --system to upgrade the Ruby gem manager if your version is old:
$ gem update --system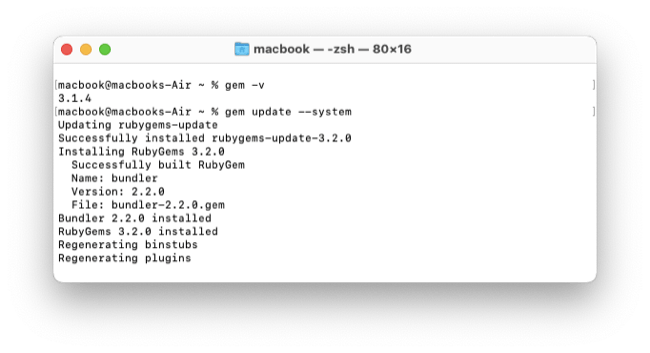
Updating gems
With Ruby, you’ve installed a collection of default gems that were current at the time of the Ruby release. It is likely some gems have been updated since the newest version of Ruby was released.
You can see a list of all gems installed with Ruby:
$ gem list
*** LOCAL GEMS ***
.
.
.
To get a list of gems that are outdated:
$ gem outdated
.
.
.
To update all stale gems:
$ gem update
Updating installed gems
.
.
.
You can track updates to gems at the RubyGems.org site by creating an account and visiting your dashboard.
Everything is ready. You can install Rails.
A newer version of this article is available as the Install Rails Mac guide on the Learn Rails website.
Install Rails
After setting up your development environment and installing Ruby, it’s easy to install Rails. It’s just a gem!
Check for the current version of Rails. Rails 6.1.1 was current when this was written.
Here are the options you have for installing Rails.
If you want to install the current stable release:
$ gem install rails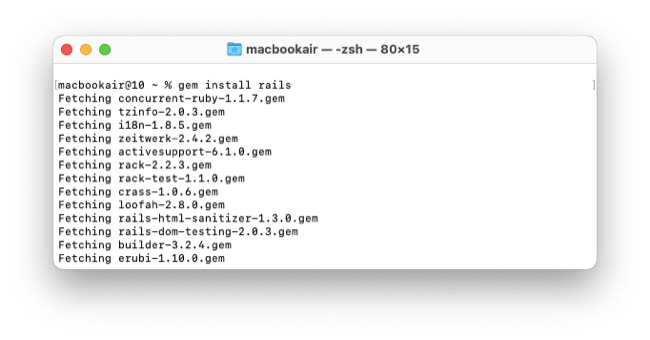
If you want the newest beta version or release candidate, you can install with --pre.
$ gem install rails --preOr you can get a specific version.
For example, if you want the Rails 5.2.4 release:
$ gem install rails --version=5.2.4🚩 After installation, close and re-open the terminal window.
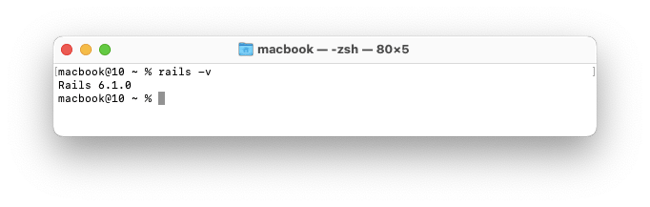
Verify that the correct version of Rails is installed with rails -v.
If you get a warning, Ignoring ... because its extensions are not built. Try: gem pristine ..., close and re-open the terminal window to start a new terminal session and try again.
Rails is now installed. If you want, you can close the Terminal window. Everything is installed, so you won't lose anything by closing the Terminal.
Next, try building a Rails application.
A newer version of this article is available as the Install Rails Mac guide on the Learn Rails website.
Rails New
Create a Workspace Folder
You'll need a convenient folder to store your Rails projects. You can give it any name, such as code or projects. For this tutorial, we'll call it workspace.
Create a projects folder and move into the folder:
$ mkdir workspace
$ cd workspace
This is where you'll create your Rails applications.
Rails new
Here's how to create a simple Rails application.
$ rails new --minimal myappThe rails new command generates the default Rails starter app. The option --minimal speeds up creation of a Rails app, leaving out many Rails "extras" that are not needed for a simple application.
We'll name the new application myapp. You can give it another name you like.
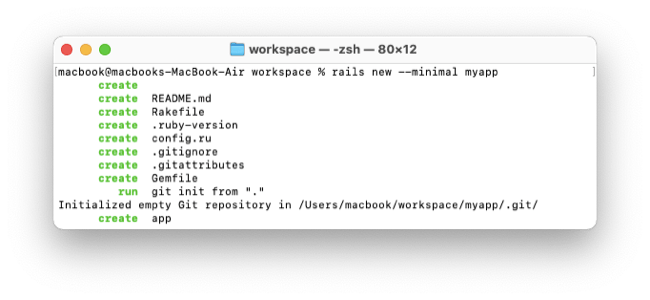
You'll do all the work of developing your application inside the myapp folder, sometimes called the project root.
For a "smoke test" to see if everything runs, move into the myapp folder and run rails -T to display a list of Rake tasks.
$ cd myapp
$ rails -T
Run the application with the Rails server command:
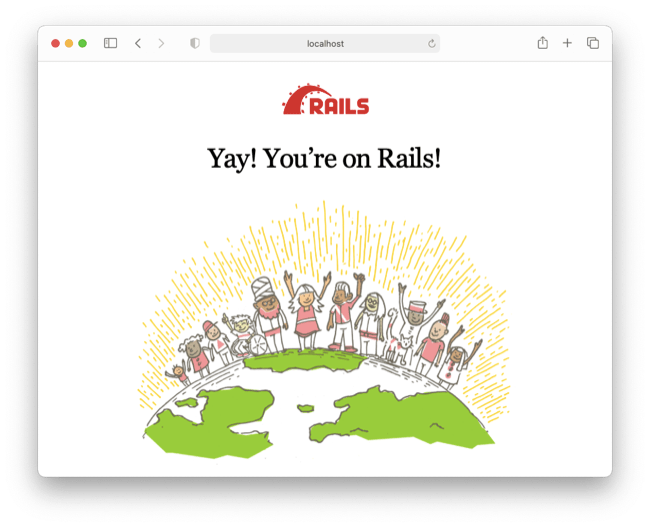
$ rails serverUse your web browser to visit the application at http://localhost:3000/.
Use Control-c to stop the server.
This concludes the instructions for installing Ruby and Rails.
A newer version of this article is available as the Install Rails Mac guide on the Learn Rails website.